The ten ideas below range from a weekend of plywood and paint to full custom millwork, and the deciding factor is whether your staircase was built plumb to begin with.
A face frame that sits 1/16 inch proud reads as handmade on open shelving and sloppy on a flush drawer front, so the finish tolerances tighten the moment you add hardware.
The battery-operated puck lights with a remote dimmer, maybe a few hundred dollars, will get a gallery display most of the way there; hardwired strips are the upgrade for the year after.
[link-whisper-related-posts]1. Modern Built-In Bookshelf Wall
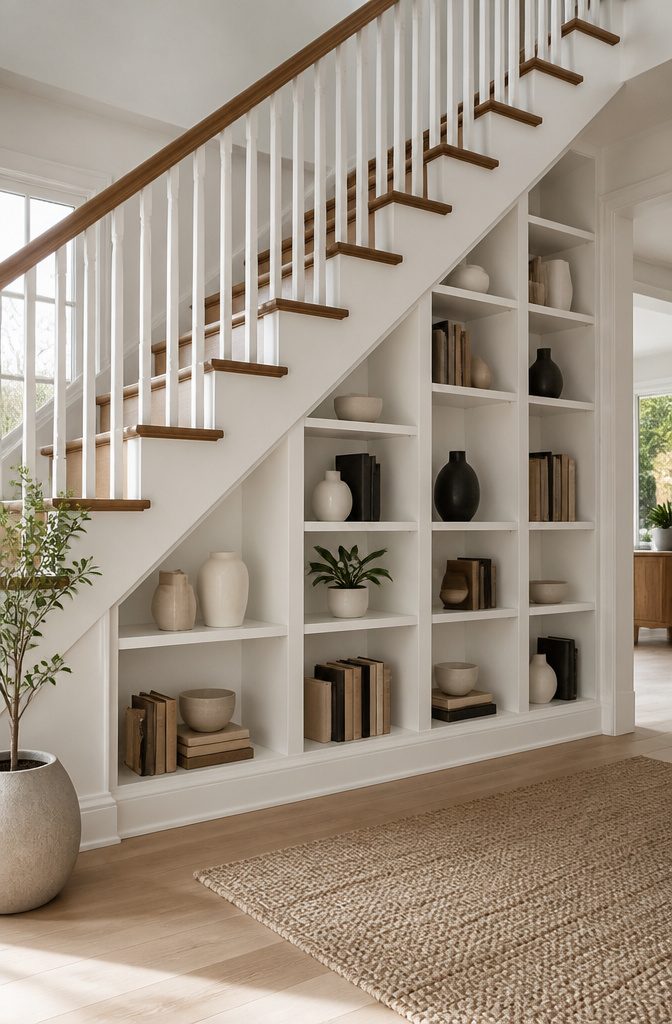
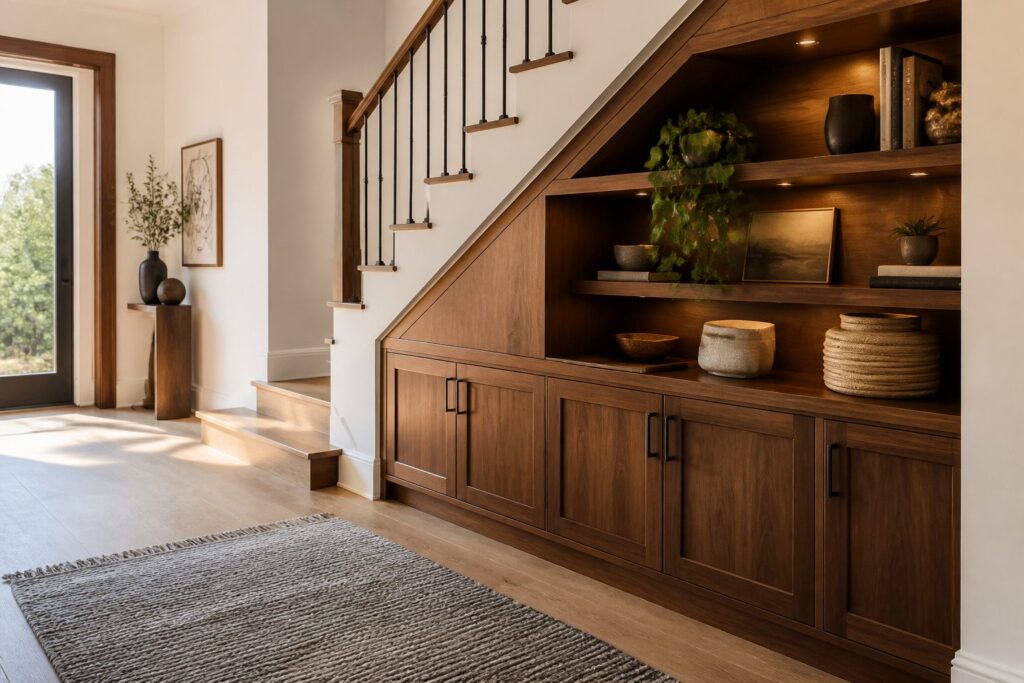
A modern built-in bookshelf wall turns the awkward triangle under a staircase into usable architecture instead of dead space.
Open cubbies follow the stair’s angle so the shelving reads as intentional, not improvised, and the repetition of identical compartments keeps the look disciplined rather than cluttered.
Paint the built-in to match your existing staircase or the wall color and it dissolves into the structure; contrast it in black against walnut tones and it becomes a deliberate feature.
Either approach works, but the finish is what sells the luxury. I lean toward continuity when the stair itself is handsome, and contrast when the stair is basic and the shelf needs to carry the room.
Display weight matters in open storage. Hardcovers, ceramics, and a single sculptural object per cubby look intentional; filling every slot creates visual noise that defeats the purpose.
Floor-to-ceiling installation uses every inch, though in a small apartment that scale can overwhelm, so stopping at the stair’s halfway point is sometimes the smarter call.
2. Gallery-Style Staircase Display Nook
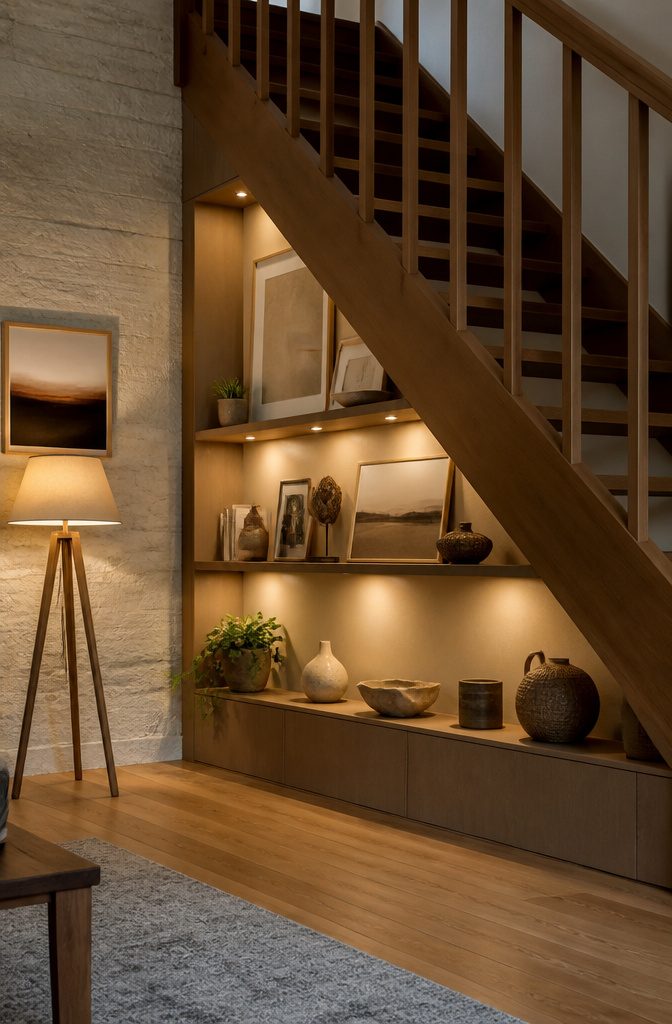
Wedge-shaped under-stair space fights you on every shelf depth, but that same angle becomes an asset once you stop fighting it.
Shallow top shelves, deeper ones below, and the whole thing reads as intentional architecture rather than storage crammed into a leftover corner. Art stays visible, collectibles stay reachable, and nothing disappears into a shadowy cabinet cave.
Warm spotlights tucked into each cubby are what separate this from a bookcase you built on Sunday.
The fixtures themselves matter less than the color temperature and the angle: 2700K LED strips or miniature adjustable spots aimed at the face of the object, not the wall behind it.
Glare off glass or gilded frames ruins the museum effect faster than dimness does. Matte ceramics forgive almost any light; framed pieces need the beam to graze the surface, not punch through the glass.
I would skip recessed cans in the ceiling of the stairwell entirely.
They wash the treads and leave the display in silhouette. The money goes into the shelf lighting first, the stair lighting second if the budget stretches.
For a few hundred dollars and a weekend, battery-operated puck lights with a remote dimmer get you most of the way there; hardwired strips are the permanent upgrade for the next project year.
3. Cottage-Inspired Laundry Console
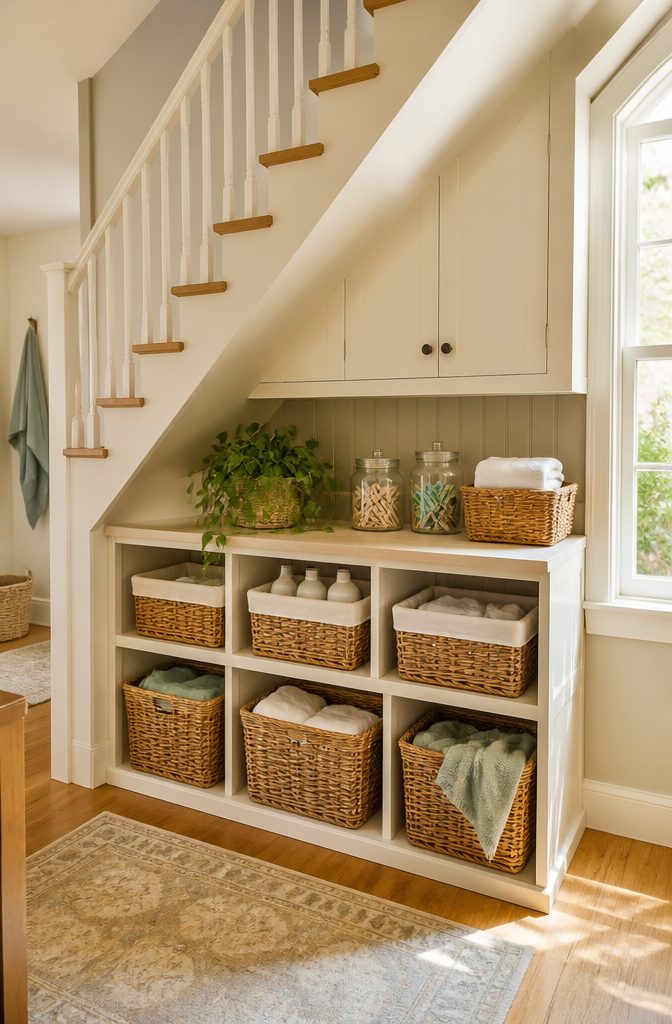
Wicker baskets are the storage choice that makes an under-stair laundry console feel intentional rather than improvised.
I like them here because the weave adds warmth that painted MDF alone never achieves, and the natural texture softens a job nobody enjoys doing.
The setup works best as a hybrid: wicker baskets on open shelving for daily supplies, with a small closed cabinet tucked behind for the bleach bottles and stain sprays you reach for less often.
Open shelving keeps essentials visible and within arm’s reach, which matters when your hands are full of damp towels. The baskets themselves hide the visual clutter of mismatched detergent pods and dryer sheets.
Soft whites on the surrounding cabinetry keep the cottage palette quiet, and a few glass jars for clothespins or wool dryer balls add enough structure to keep the baskets from looking like afterthoughts.
Greenery helps too; a single trailing plant on the top shelf draws the eye up and makes the whole recess feel less like a utility zone.
Dust is the price you pay. Wicker traps lint in a way that solid bins do not, so I would line the baskets with canvas or plan to shake them out monthly.
For a hallway that sees daily traffic, that small maintenance cost buys a corner that actually looks finished.
4. Sleek Japandi Drawer Wall
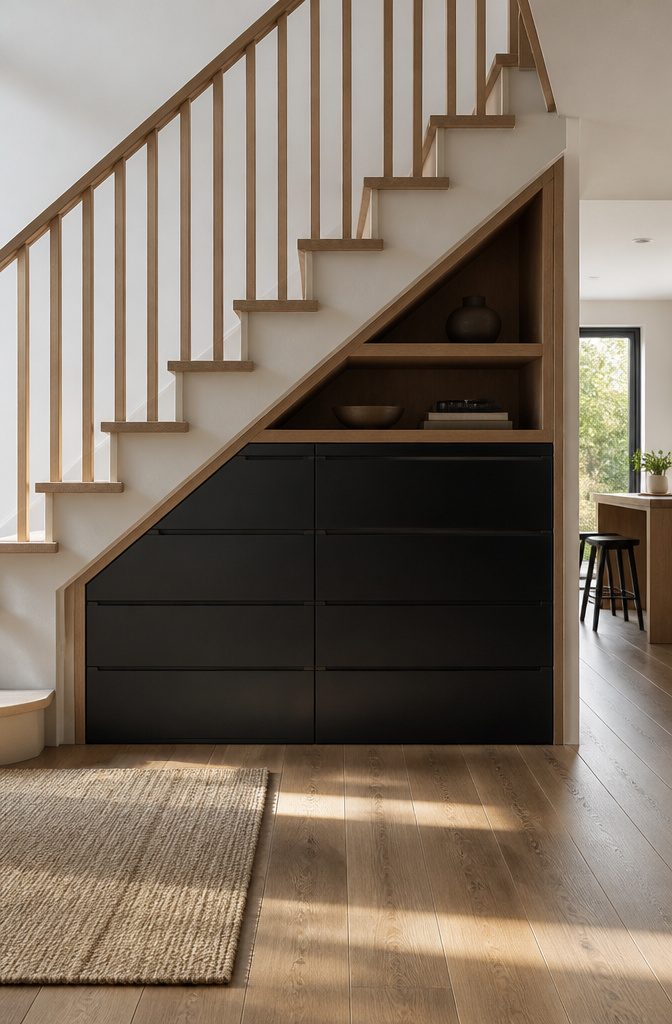
Japandi is the hybrid of Japanese minimalism and Scandinavian warmth: clean lines, natural materials, and nothing extra. Built-in drawers fit this pairing almost too well.
The Japanese side wants visual calm; the Scandinavian side wants the home to feel lived-in. Hidden storage satisfies both by swallowing the clutter that would break the mood.
Matte black hardware against warm wood tones grounds the look without heaviness. The drawers glide out for tech gear or seasonal decor, while open shelves above hold books and a single sculptural piece.
That mix is the whole trick: closed storage maintains the quiet, open shelves keep it from feeling like a showroom.
For a weekend project, a ready-made unit slips into the stairwell without demo. The result reads as built-in because the dimensions match the slope exactly.
The narrowest drawer depth that still clears your tread structure is the detail that makes or breaks the visual calm; anything deeper and the face sits proud, anything shallower wastes the only space you have.
5. Rustic Wine Bar Nook
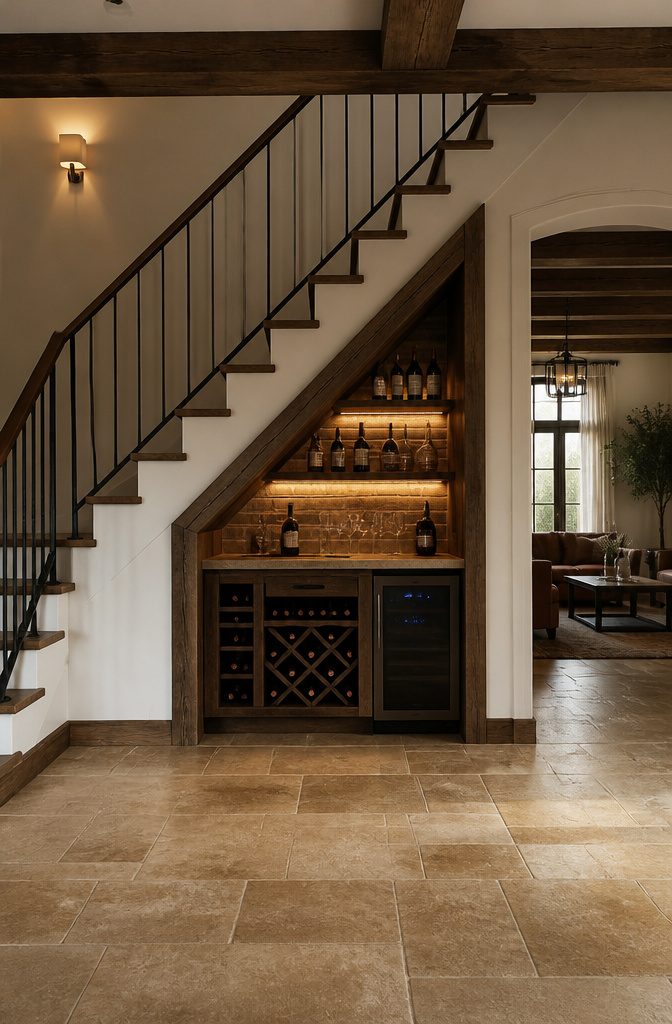
A rustic wine bar nook under the stairs works because the space is already tucked away and intimate.
Open shelving in thick timber boards gives you somewhere to set bottles and glassware at arm’s reach, and the raw wood against a back wall, maybe brick if you have it, reads as deliberate rather than improvised.
I would keep the shelves at a depth that clears the stair stringer, usually 10 to 12 inches, so the overhang does not become a head knock.
The compact wine fridge is what makes this configuration practical for actual use. It slides into the lower cavity where headroom is already limited, and it runs on a standard outlet, no plumbing required.
That matters because a wet bar would need a water line and drain, and pipes are rarely present in a stair void.
A dry bar setup avoids all of that: bottle storage above, prep surface at counter height, fridge below, done.
Warm lighting finishes it. Soft bulbs under the shelves highlight the timber grain and keep the glow low enough that the nook feels like a destination, not a storage afterthought.
6. Boho Basket Cubby
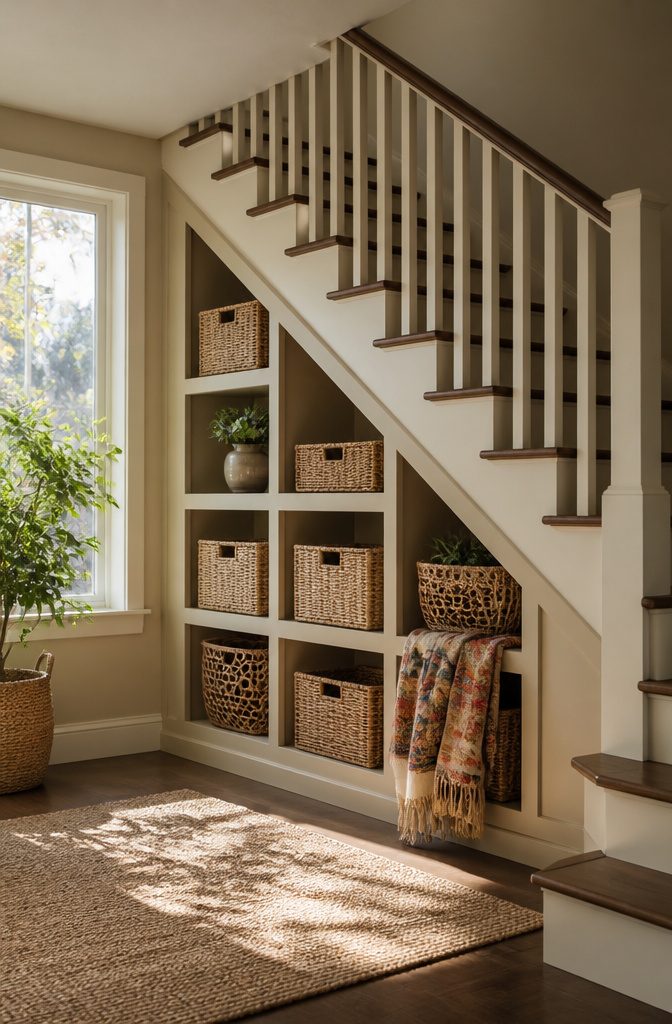
Woven baskets tucked into open cubbies give under-stair storage a quieter, more forgiving presence than hard cabinetry. The natural texture softens the geometry of the staircase itself, and the overall cost stays low because you are building shelves, not drawers.
A simple plywood box frame, painted or stained, runs far less than custom millwork with hardware and sliding tracks.
The real advantage is flexibility. Baskets slide out entirely, so the cubby can hold linens one year and shoes the next without a screwdriver.
For renters, this matters. You install nothing permanent, and when you move, the baskets travel with you.
The frame itself is usually three or four fixed shelves; if the stair slope is awkward, you build the tallest cubby at the wide end and step the heights down.
I would skip lidded baskets here. Open tops let you toss things in without breaking stride, and the slight disorder of a visible towel edge or folded throw is part of the look.
Aim for one basket size across the row so the front edges line up clean. Mixing sizes works only if you alternate them with intention, and most of us will not.
7. The Under-Stair Work Nook
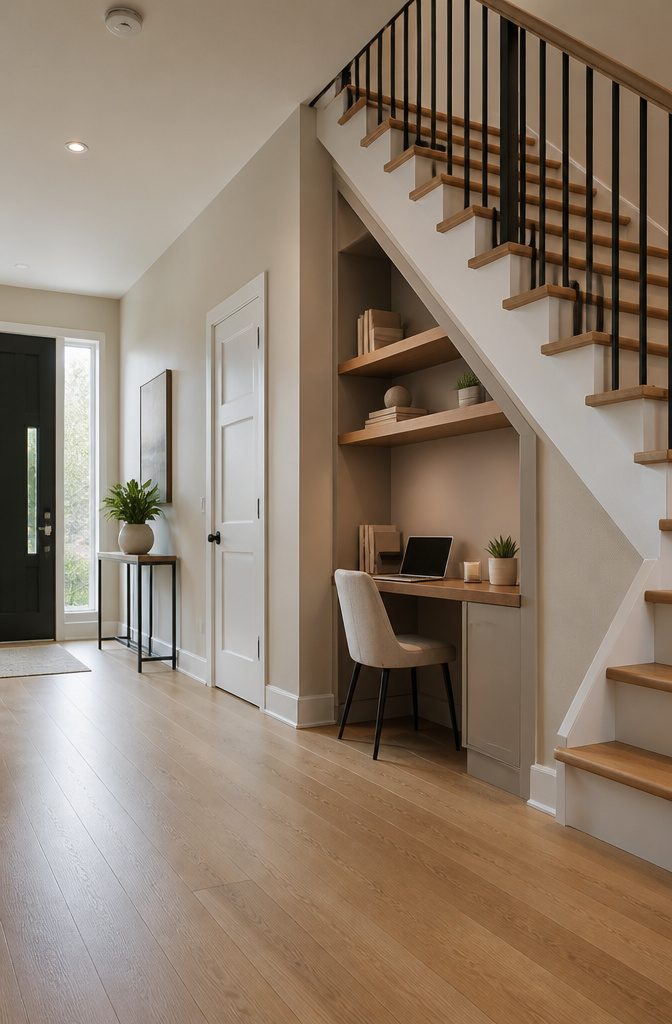
A desk tucked under the stairs needs at least 20 inches of clear depth to hold a laptop and your forearms without the angled ceiling pressing in.
I would not go shorter; 24 inches is the point where the space starts to feel like a real workstation rather than a compromise.
The chair matters as much as the surface. You need roughly 36 inches of floor depth from the desk front to the first riser behind you, or the seat back hits wood every time you stand.
That footprint competes directly with storage cabinets, which can run shallower and pack more in.
A work nook wins only if you actually need a daily desk; for occasional bills, a pull-out shelf in a cabinet wall uses half the volume.
Built-in shelves above the desk follow the angle of the stringer and keep the footprint tight.
Floating shelves with hidden brackets give the cleanest look, though rustic industrial shelving with open brackets reads warmer if the staircase is already timber. Either way, soft lighting under the shelf lip keeps the glare off your screen.
This is one of the few under-stair conversions that demands electrical access.
A single outlet at desk height handles a laptop and a task lamp; without it, you are running cords across a hallway, and that alone kills the luxury feel.
If the studs are open, add the outlet before the cabinet goes in. Afterward, the repair is invasive enough that most people skip it and live with the mess.
8. Sleek Panel Storage Wall
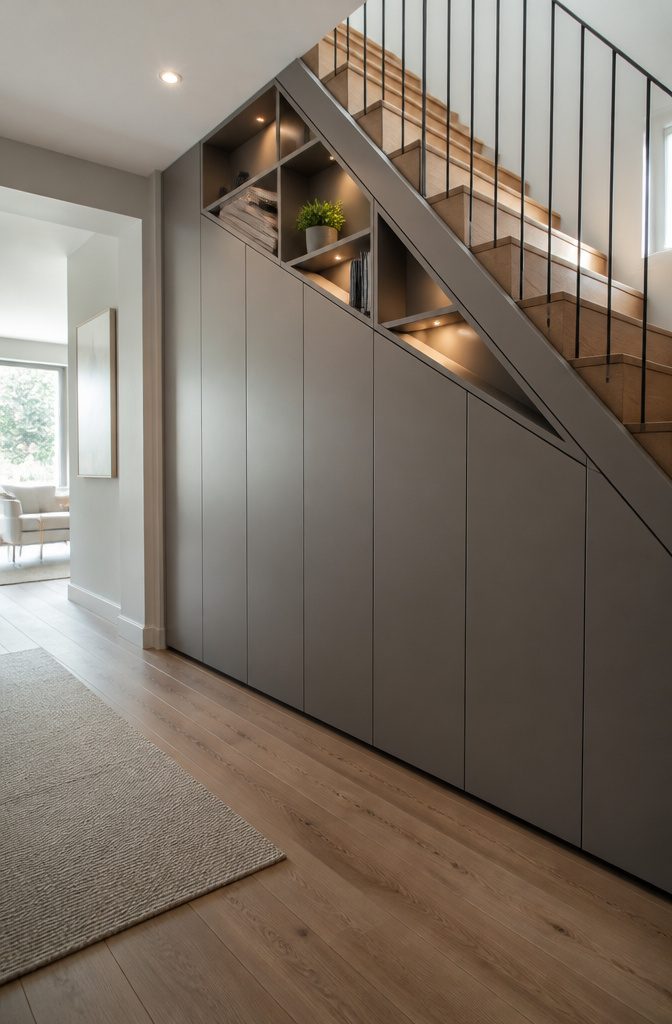
Flush cabinet doors read as wall rather than cabinetry because the gap between them disappears. I like handleless push-latch hardware for this, since any protruding pull breaks the flat plane and turns the surface back into furniture.
The latch sits inside the door edge; you press and it springs open, no visible mechanism from the front.
Matte gray keeps the look crisp and modern, while wood stair treads above add warmth that keeps the whole thing from feeling sterile.
Drawers glide out for hidden storage, open shelves above for books or a single plant. The effect is architectural, not added-on.
The unit blends into the stairwell like it was always meant to be there.
No drilling, no demo if you start with a ready-made system sized to your opening. Luxury here is smart simplicity: the eye reads structure, not storage, and the clutter stays out of sight.
9. Under-Stairs Wardrobe Haven
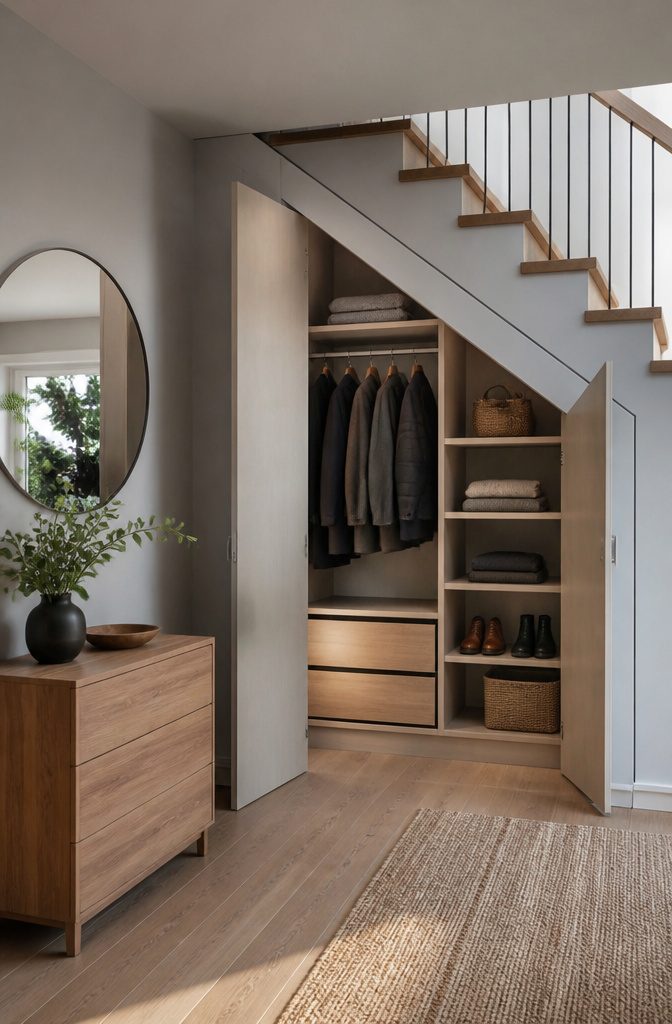
The angled ceiling beneath a staircase is the first thing a wardrobe builder has to solve. Hang rods parallel to the slope, not across it, and the usable depth shrinks to nothing after the first few inches.
The better move is a short rod placed at the back where the ceiling is highest, paired with shelves or drawers in the low triangle up front.
A custom built-in handles this split well.
Marie Flanigan’s version mixes hanging rails with shelves, keeping daily pieces at hand and seasonal items above. The finish reads as furniture, not afterthought.
This competes directly with the open wardrobe approach.
I would close it every time. Doors hide the visual noise of daily life, and the stair angle already creates enough geometry to manage.
Open only wins if the stair sits in a bedroom and the whole point is waking up to a boutique display. For a hallway or landing location, the closed cabinet keeps the luxury quiet.
The cost is in the fitting. A pre-made unit leaves gaps that collect dust and defeat the purpose; a built-in follows every angle exactly.
10. Under-Stairs Open Wardrobe
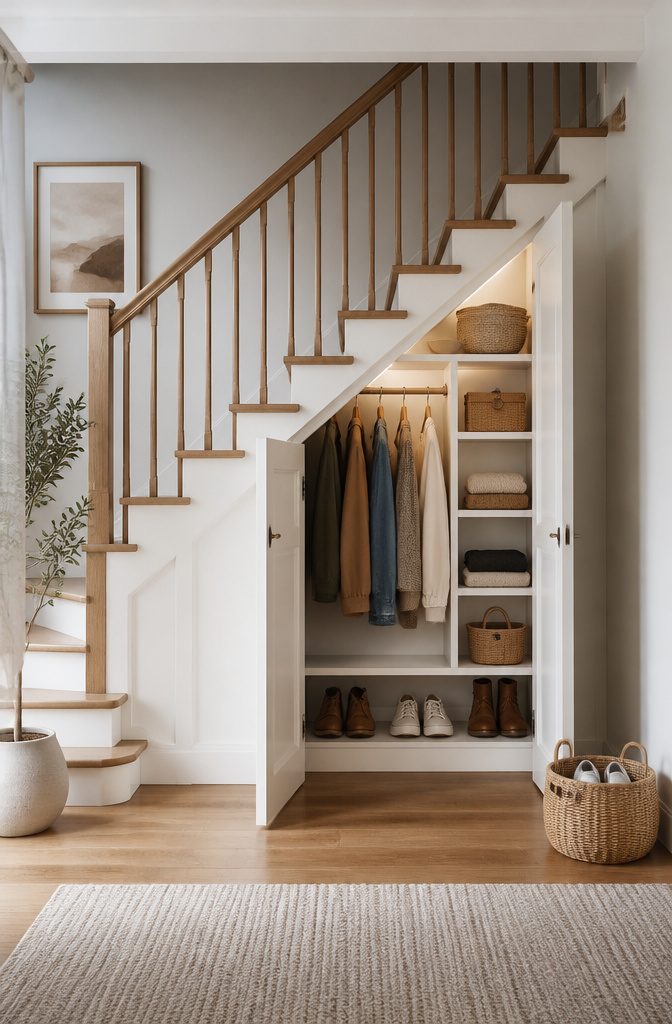
An open wardrobe under the stairs lives on a different schedule than its closed counterpart.
Where the wardrobe haven suits linens and out-of-season pieces you visit occasionally, this version is built for clothes in active rotation: the shirt you grab at 7:12 a.m., the basket of clean laundry that never quite makes it upstairs.
Dust matters less here because nothing sits long enough to collect it.
The real win is visibility. A hanging rod at standard height, a few shelves at staggered levels, and the contents stay in sight and in reach.
No doors to open, no hardware to source. Sources describe wood shelves in varying heights that create depth against a white staircase, with baskets corraling smaller items into uniform texture.
That combination of rod, shelves, and baskets costs less to build than a fitted enclosure because you skip the door panels, the hinges, and the precise alignment they demand.
I would put this in a hallway that sees heavy morning traffic, or in a home where one closet serves two people and overflow is constant. Everything faces the room, so the editing matters more.
A closed wardrobe forgives a hurried fold. This one does not.
DIY or Professional Installation
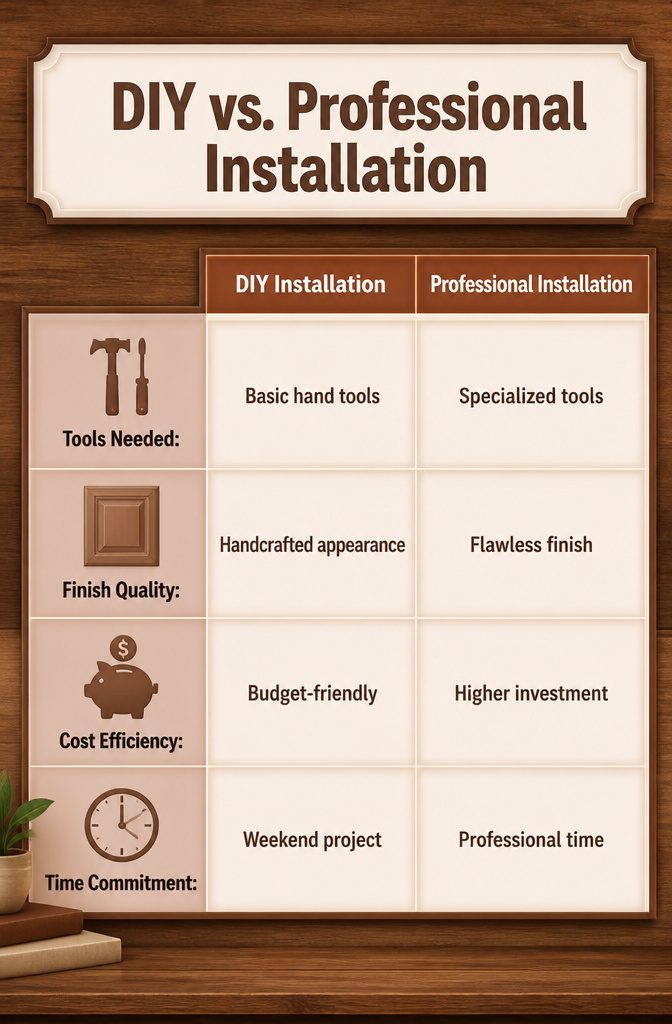
The line between a weekend project and a pro job sits at the finish of the face frame, not the box behind it.
Open shelving like the built-in bookshelf wall from Forge & Bow is reachable with a circular saw, a pocket-hole jig, and patience; paint the shelves the same color as existing built-ins in the room and the gap between DIY and custom narrows to almost nothing.
Add drawers, a wine cooler, or any appliance and the tolerances tighten. A 1/16-inch gap that reads as handmade on a shelf reads as sloppy on a flush-mounted drawer front.
I have watched enough under-stair builds to know where the money goes. A pro saves you the cost of a second sheet of plywood when your first cut for a pull-out drawer wall is an inch out of square.
They also carry the liability for scribing cabinets to a staircase that was never plumb to begin with.
For the ideas that rely on visual continuity, the ones where the cabinet face becomes the stair skirt itself, hire the finish carpenter.
For a painted bookshelf nook you will dress with baskets and books, rent the saw and clear Saturday.
Hidden Storage and Secret Details
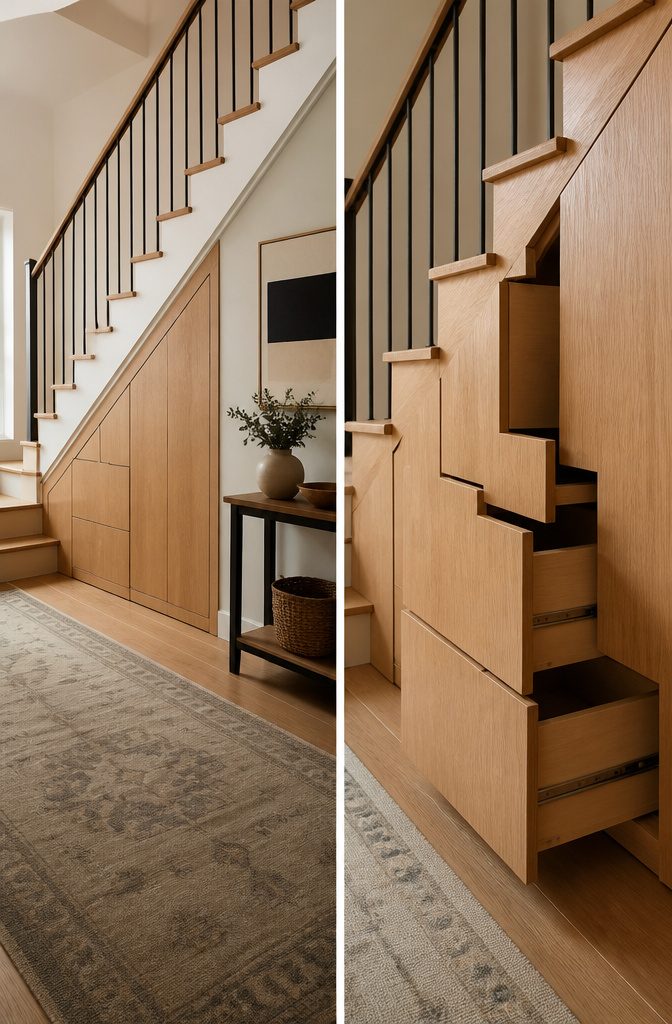
Stair risers as drawers look like a magic trick the first time you see them, but they are almost always add-ons that bolt onto existing treads rather than replacements.
The Kin Design hinge systems mount to the underside of each step, which means the original staircase structure stays intact and a renter with a drill can usually handle removal later.
The coastal cabin example with actual drawer fronts cut into the risers is a different story: that is structural modification, because you are removing material from the vertical face that supports the tread above.
I would not attempt that without a carpenter checking load paths.
A hidden door under the stairs is the same split.
Decorative wall paneling on a pivot, painted to match the wall and trim, is surface work. Ashley Montgomery Design’s version looks continuous because the paneling spans the full lower wall and the door seam is just one line among many.
But a door that actually leads into a storage room or pantry framed under the staircase needs framing, and that is modification.
The Aspire Fine Homes secret room falls here: it is entertaining, and kids do love it, but you are building a conditioned space with proper walls and possibly HVAC, not installing a cabinet.
For a weekend project on a few hundred dollars, the hinge-tread storage wins cleanly.
It adds real square footage without permits or drywall dust. The hidden door only makes sense if you already have the cavity and just need to disguise the access.
Beyond Storage: Play Areas and Powder Rooms
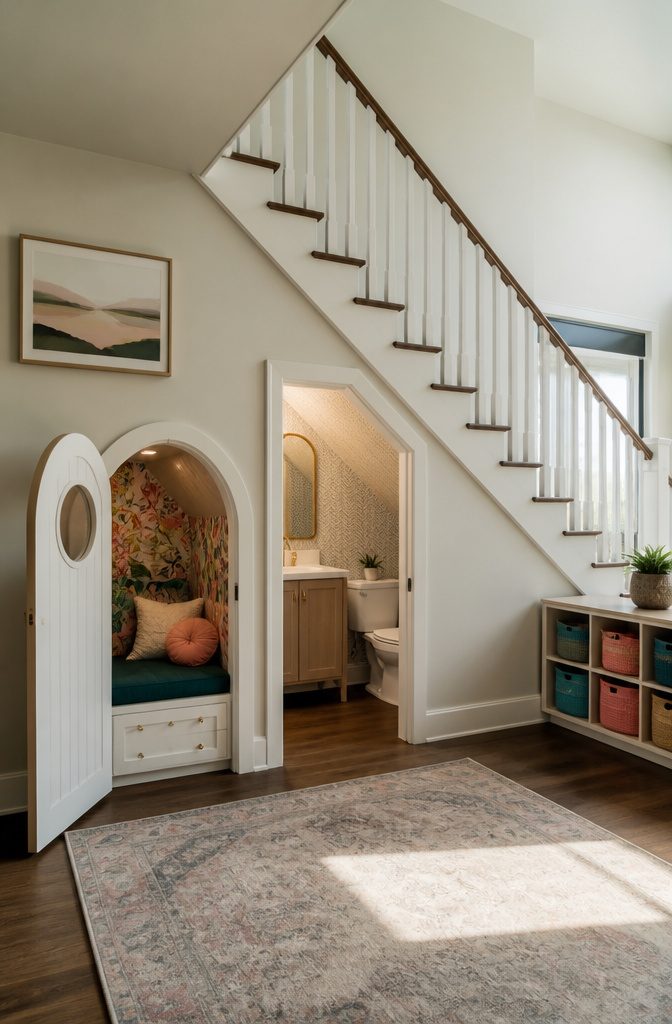
A powder room under the stairs reads as luxury because it solves a real problem, but most homes never get one.
The reason is straightforward: building codes. A toilet needs a vented drain line, supply plumbing, and a ceiling height of at least 7 feet in most jurisdictions, which the slope of a staircase often violates at the back of the run.
You are building a real bathroom in a space shaped like a wedge, and the cost jumps from cabinetry to waterproofing, permits, and possibly a pump if the drain sits above the fixture.
Children’s play nooks face no code barrier, which makes their rarity stranger. Slides built into risers and toy boxes hidden in treads read as fantasy more than weekend projects.
A simpler approach, and the one I would actually build, treats the space as a finished alcove with a soft floor and a door the child can operate.
The value is in containment: toys stay in one zone rather than migrating through the hallway.
For resale, the powder room wins cleanly.
A buyer sees a half-bath where there was none. A play nook, charming as it is, ages out in five or six years and then must be rebuilt.
If the plumbing rough-in is already there from a previous renovation, the powder room becomes an easier yes. If not, the play area gives you usable space this weekend without a permit application.
Matching Finish to Staircase Style
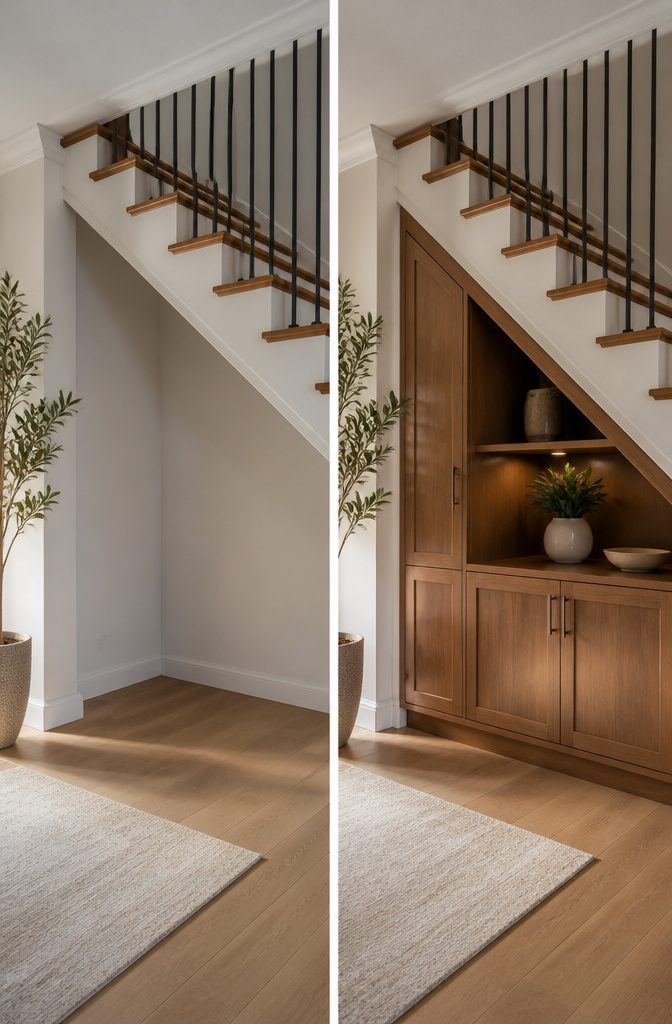
The first thing to check is whether your stairs read as warm or cool.
Oak and maple lean golden; walnut and mahogany run deeper and redder. Painted risers in a historic home almost always look richer with a cabinet in the same sheen, not a near-match that reads off by half a tone.
I have seen satin millwork beside semi-gloss treads, and the difference catches light like a mistake.
For a painted staircase, pull the cabinet color from the wall adjacent to the stairs, not the tread itself. The eye travels the wall line, so continuity there matters more than matching the nosing.
In a modern stair with open stringers, I would wrap the cabinet in the same veneer as the visible stringer edge; anything lighter floats the cabinet forward and breaks the plane.
Contrast works when the staircase already has two materials, say wood treads on a white painted carriage. A black or charcoal cabinet then picks up the shadow gap between tread and wall and turns storage into a deliberate stripe.
Without that existing contrast, a bold cabinet color under a quiet stair looks like a leftover from another room. The safer move is one shade deeper or lighter than your dominant wood, which reads as intentional variation rather than mismatch.
Frequently Asked Questions
How do you use the empty space under stairs?
Built-in storage like bookshelf walls, drawer systems, or wardrobe cabinets work, as do functional spaces such as a work nook, wine bar, or laundry console.
What is the storage area under stairs called?
It is commonly called under-stair storage, the under-stairs area, or simply the space beneath the staircase. Designers often refer to specific configurations by function, such as an under-stair cabinet, work nook, or wardrobe haven.
Are there any special considerations to keep in mind when buying an under the stairs storage unit?
Measure your exact dimensions first, since stair voids are rarely square and pre-made units leave gaps.
Match the finish to your existing staircase, and decide between open or closed storage based on whether the space faces a hallway or a private room.